Acentuação gráfica e caracteres especiais no Mac

Migrar para outra plataforma de qualquer coisa sempre dá um trabalhinho, até para coisas “bobas”…

Passei um tempo pesquisando como escrever ç, ã, é, ê, ª, º e outros sinais gráficos e símbolos no Mac, coisa que fazia no Windows/PC de olhos fechados, até o ª e o º, eu fazia até com código tipo alt+167…

Existem por aí alguns tutoriais de como adicionar um arquivo de layout de teclado para facilitar a digitação no Mac, mas prefiro manter o original e me fuder fazer do modo tradicional. 🙂

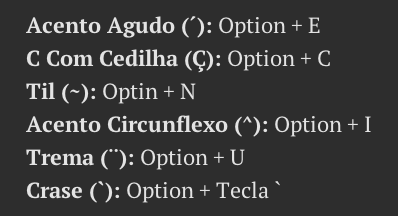
Segue aí colinha dos atalhos mais utilizados:


tela1

Depois de um tempo você acostuma e não precisa mais da cola, mas se estiver se adaptando ao teclado da Maçã vale a pena manter esta imagem na Mesa.

Tem outros atalhos que não estão na cola acima, que são:

a ordinal ( ª ): Option + 9 (nove do teclado principal, acima da letra o – não é o do teclado numérico)
o ordinal ( º ): Option + 0 (zero, mesma coisa do 9 acima)
r de marca registrada ( ® ): Option + r
c de copyright ( © ): Option + g
bolinha de grau/temperatura ( ˚ ): Option + k
caractere de “rabo de olho” ( ¬ ): Option + l (ñ sei o nome deste caractere… ¬¬)

Outras combinações vc pode ficar tentando aí no teclado segurando Option, Option + Shift + etc.
 

Gravar ISO XGD3 Mac OS X

Pre-requisites:
truncate
growisofs, XboxBurner or OSx360
Links:
download truncate/dvd+rw-mediainfo/growisofs pack here or here
download XboxBurner here (XboxBurner bundles/installs growisofs and dvd+rw-mediainfo to the following dir: /Applications/XBoxBurner.app/Contents/MacOS)
download OSx360 here

Alternatively: Manually installing truncate:
1) Install XCode 4 from the App store (Note: this downloads the Xcode installer)
2) Run the “Install Xcode” app created in your Applications folder
3) Install Macports (download here)
4) Install the necessary binarie(s) using the following commands:

sudo /opt/local/bin/port selfupdate
sudo /opt/local/bin/port install truncate

Step 1

Truncating an XGD3 ISO on OSX:

/opt/local/bin/truncate myXGD3backup.iso 8547991552

Step 2

Burning w/ XboxBurner GUI:
This is not possible yet as the LayerBreak field is fixed. Will update if/when XboxBurner is updated to support the required offset

Burning w/ growisofs using XboxBurner binaries:

/Applications/XBoxBurner.app/Contents/MacOS/dvd+rw-mediainfo /dev/rdisk5
(use this command to verify which drive is the DVD writer)
/Applications/XBoxBurner.app/Contents/MacOS/growisofs -use-the-force-luke=dao -use-the-force-luke=break:2086912 -dvd-compat -speed=4 -Z /dev/rdisk5=myXGD3backup.iso
(repace rdisk5 with the correct drive number)

Burning w/ growisofs (using attached binaries):
dump the 3 binaries into /usr/sbin

dvd+rw-mediainfo /dev/rdisk5
growisofs -use-the-force-luke=dao -use-the-force-luke=break:2086912 -dvd-compat -speed=4 -Z /dev/rdisk5=myXGD3backup.iso

(again substitute rdisk5 with your DVD’s drive number)

Burning w/ OSx360:
In OSx360 “Configuration” uncheck everything except for “Perform Action on File Open” and set to “Go to Burn View”
Check “Specify Custom Layer Break” type 2086912 *hit return/enter* then close the configuration window
Before burning set “Speed” to 4X (or 2.4X)” and “Method” to growisofs

Fonte: